How to Mill Your Own Lumber on a Bandsaw

So you’ve got a log. Maybe its a tree that came down nearby, or maybe somebody heard you’re a woodworker and offered you a log. And you have a bandsaw. You start wondering if you can mill this log into boards yourself. Sure, you could invest in an Alaskan chainsaw mill, or you could try to find someone nearby who runs a hobby sawmill to cut it up for you. But you would love to be able to say you made something from wood that you milled yourself.

It’s a question that gets asked a lot. And not many people have answers that aren’t hypothetical because not many woodworkers do it. There are reasons for that (keep reading!), but it’s something I’ve done quite a lot. And it is a LOT of work. But it can be done. Here’s how I do it.

To begin with, don’t try to saw up a whole log on your bandsaw. Unless the log is quite small and very straight, you will struggle to make a straight cut, and the log will want to rotate on you. Besides, a log small enough to send straight through the bandsaw is going to be too small to yield much usable wood anyway. You want a log big enough that it will actually yield usable boards, which means you have to do a lot of processing before you even get to the bandsaw.

Here is how I do it:

1. Be picky about your stock.

Just because you have a log doesn’t mean you’re going to get nice lumber out of it. There are many, many logs that are good only for firewood. So first consider whether sawing this particular log into boards is really going to be worth the trouble. Take a good, hard look at it. If it’s twisted or knotty, or if it has rotten spots, it’s not worth messing with. And don’t bother with wood species that you can easily get commercially, either. You are looking for a log that is straight, clear, and sound all the way through.

If you get to choose your logs, then you’ll find that some woods are a lot easier to do this with than others. For your first time especially, try to find a wood that will split fairly straight–like walnut, hickory, or one of the oaks. Some fruit woods, like cherry, can also work. Other woods, like elm, will be a lot more difficult. But this is a great method for getting lumber out of species that aren’t available commercially, or logs from trees that have sentimental value. You may also be able to get good lumber out of tree species that that are too small to sawn commercially.

2. Crosscut the log to length.

Cut the log not much longer than your bandsaw’s outfeed table. (Do you have outfeed support for your bandsaw? Because if you don’t, this is going to be really difficult. I strongly recommend rigging up some kind of outfeed table for your bandsaw.) There’s a limit, though, to how short or long is practical. Too short (under 2 feet) and it will be too short to use. Too long (over 4 feet) and you’ll have a really hard time handling it on the bandsaw. After doing this a couple times, you’ll get a feel for how long a log you are able to handle.

3. Split the log, at least in half.  

I often use my chainsaw to saw a shallow kerf where I want the log to split. Then I drive in steel wedges to split it. If all goes well, the split side will be nearly flat enough to lay on the bandsaw table so I can saw up the log. With a bigger log, I’ll split it into quarters or even eighths. The more you can do with wedges and a sledge hammer, the better. 

4. Remove the bark and pith, and (depending on the species) maybe the sapwood.

A froe, hewing hatchet, or drawknife is handy here. If you’re cutting oak, you’ll want to cut away the sapwood. The more work you do with your coarse tools, the less work you’ll have to do on the bandsaw. Be sure to cut/split the workpieces down enough that they will actually fit through your bandsaw. If you have 6″ of cutting depth on your bandsaw, then that’s as wide as your workpiece can be. There’s nothing quite like getting to the end of a cut only to find out that the very end of your workpiece is 1/8″ too high to fit through the bandsaw. Use a drawknife or hatchet to take off any high spots. I have found it best to plan for at least 1″ of clearance under the top guide of the saw’s bade.

You will also want to cull your stock at this point. Splitting the log will reveal defects like large knots that won’t be worth the effort to cut through. Be willing to discard some (or even all!) of a log that ends up having too many defects. The logs in the pic above were all cut fairly short because I just needed to make wooden spoons out of them. 30″ was plenty long enough for that purpose.

5. Get the bandsaw ready.

Make sure you cut with the coarsest, widest blade you can put on the saw. I use a hook-tooth, 3 PPI blade. And make sure it is SHARP. A dull blade will make this much, much harder than it already is. And (in case you missed the point the first time) you really do need some kind of outfeed support–even if it’s just a partner who will help you on the other side of the table. A solid outfeed table of some kind is even better. Also make sure your bandsaw won’t move when you bump it. If you’re feeding a 40 lb. chunk of wood through it, you don’t want it rolling around on you, or tipping over!

6. Mark your cuts with a square and a chalkline.

Examine each section of the log carefully to see which is the flattest side, and how you can cut it for the best results. Because you’ve split the log, this method strongly lends itself to quarter-sawing. You will probably need to do a little work with a hewing hatched or drawknife to make the reference face flat enough. It needn’t be perfectly flat, but it shouldn’t rock on the table.
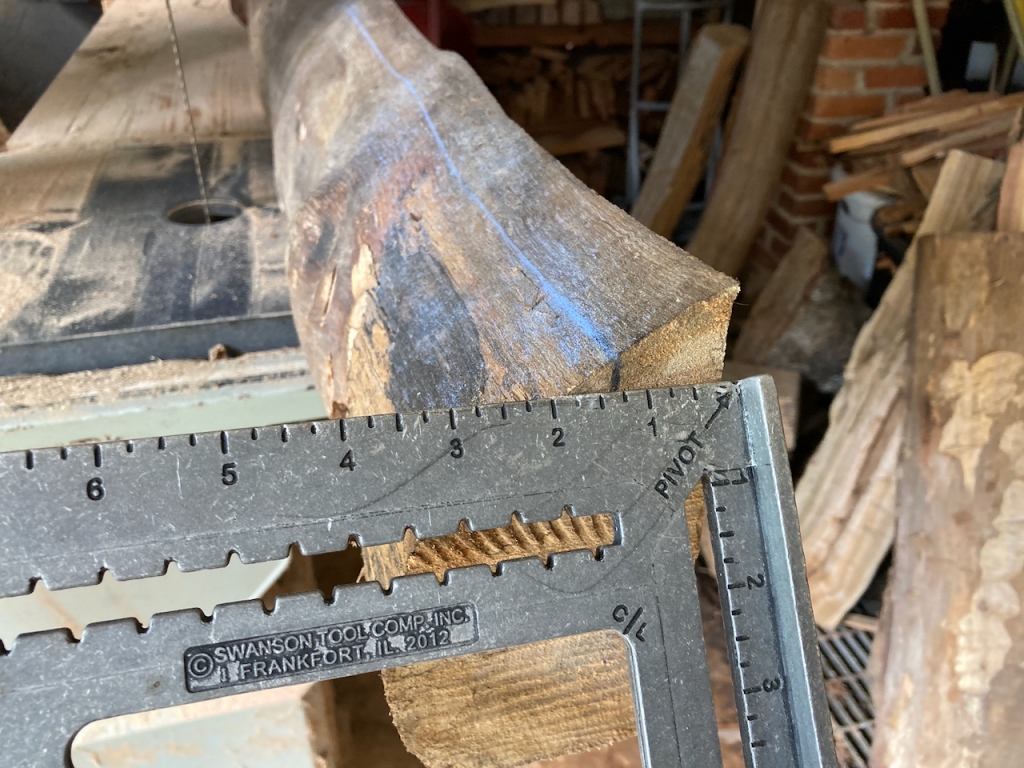
Use a square and a pencil to mark out your first cut on each end of the workpiece. It is best to saw your log section into pieces about the thickness that you expect to use–allowing a little extra thickness for shrinkage and planing, of course. I’m sawing the log section above to 1 1/4″ in the hopes of having a board I can finish to 1″ thick after it dries.

Connect your thickness marks on each end with a chalkline. The chalkline is invaluable here! It gives you a clear reference to follow as you saw.

7. Now saw the wood!

As you push the wood through the cut, follow the line carefully, and keep the feed slow and steady. After a few inches, the blade may start to bind. Have some small, wooden wedges ready to drive into the kerf to keep it open. You do NOT want to pinch the blade in the middle of a big, wet, heavy workpiece that you are struggling to balance on the bandsaw’s table. (Trust me on this one….)
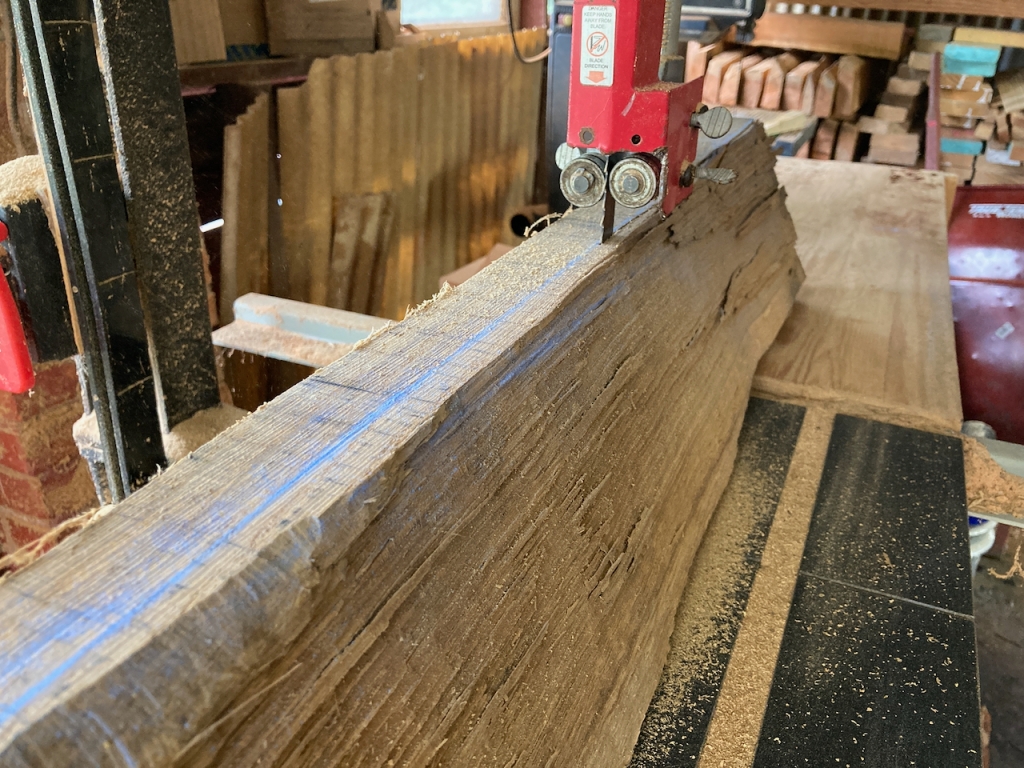
If all goes well, you will open up a nice, sawn surface!

Once you’ve made your first cut, you have a few options. You can keep the workpiece in the same orientation, or you can rotate it 90 degrees, using the freshly-sawn face as the new reference face. You can also flip it end-to-end. I plan out one cut at a time, depending on the grain pattern I reveal with each cut.

8. Set a fence.

After the initial cut, a single-point fence will help cut to a consistent thickness. If you have several log sections to cut up all at once, it’s best to make an initial cut on several pieces, set the fence once, and run all the workpieces through on the single setting. This is heavy-duty production work, so you will want to economize on time and effort wherever you can! But the result should be fairly consistent thickness from board to board.
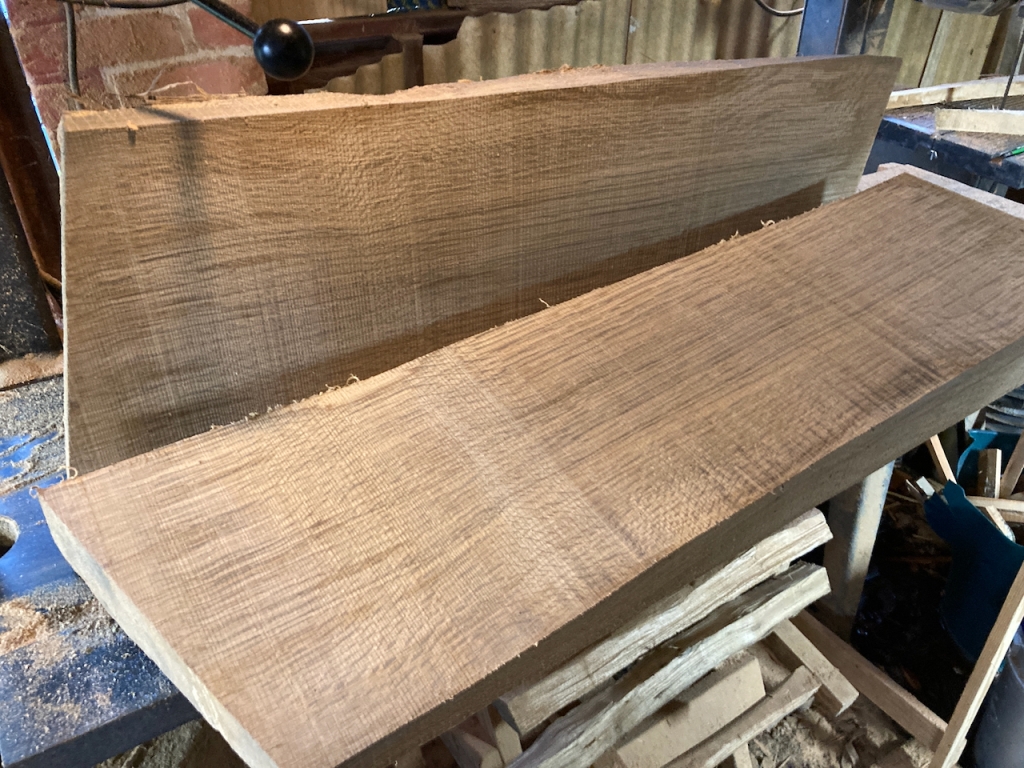
Through all the sweat, make sure you take the time to appreciate the beauty of the wood grain that you reveal. Every cut yields a new discovery!

9. Stack your lumber properly so it can dry.  

There are standard practices for stacking freshly-sawn wood so it can air-dry. Logs are full of water–even if they’ve been sitting for years! You will want to make sure it is properly stacked with stickers in a sheltered place that allows for some air movement on all sides of the pile. It also helps to weigh down the stack with something heavy. You can find lots of good online guides for air-drying lumber–no need for me to repeat them here.

Since you’re working with fairly short pieces, I do recommend that you seal the ends of your new boards with wax so as to minimize checking. You want as little waste on each end as possible.
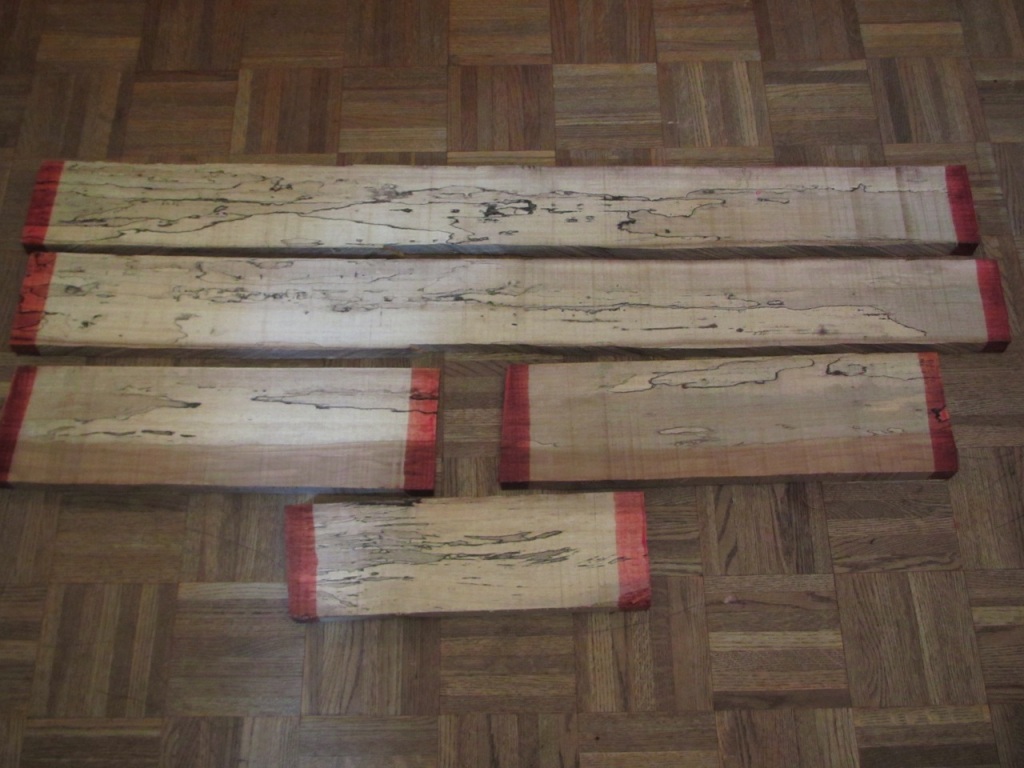
It is an extra step, but if your boards came out extra-nice (as with this spalted pecan wood) then it’s probably worth the effort.

10. Wait for the wood to dry.

Milling up your own wood is a lot of work, but what will really try your patience is waiting for the wood to get dry enough to use! There are some applications, like spoon carving, that are best done with freshly cut wood. But the vast majority of furniture work demands stock that is at least adequately dried, and often very thoroughly dried.

How long should you wait for it to dry? It depends. Under ideal drying conditions (boards cut fairly thin, properly stacked, with low humidity and good airflow through the pile all the time) then you might be able to start using it in 6-9 months. But since drying conditions are almost never ideal, you should plan to wait a year or two before you start cutting into it.

Also keep in mind that thick boards will air-dry MUCH slower than thinner ones will. You may have heard a rule of thumb like “One year per inch of thickness, plus a year”? Yeah, it’s not true. 12-18 months for 1″ thick stock is usually sufficient. But 2″ stock will still be wet inside after 3 years. Thicker boards can take exponentially longer to dry than thinner ones. So if you’re thinking of of saving effort by cutting your boards to 2″ or 3″ thick and telling yourself, “I can just resaw them into thinner boards later!” don’t listen to yourself. When you do resaw them, you’ll end up with boards of uneven moisture–bone-dry on one side and quite damp on the other side–and the board is very likely to warp. No, you are always better off sawing your boards to the thinnest practical thickness. You’ll get much better results in the long run.
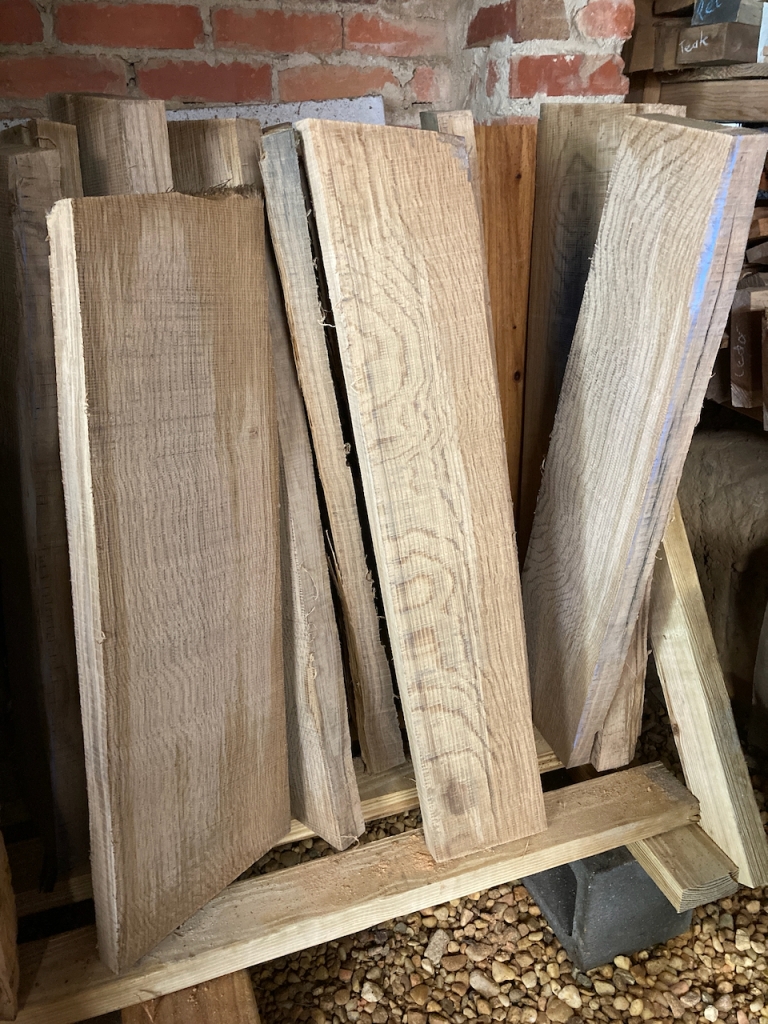
So with the right tools, a little hard work, and a lot of patience, you can mill some of your own stock from logs you have on hand.

Posted in Lumber, Power Tools, Wood and Woodwork | Tagged , , , , , , , | Leave a comment

Panel Saw Restoration

One of the perks of moving to the Midwest is that old tools are still relatively easy to find–if you know where to look. When I lived in Alabama, it was really difficult to find old tools in local antique shops, but Ohio is awash in antiques of all kinds–especially furniture. And if you’re looking for vintage hand tools at bargain prices, antique malls in Ohio are usually worth a look.

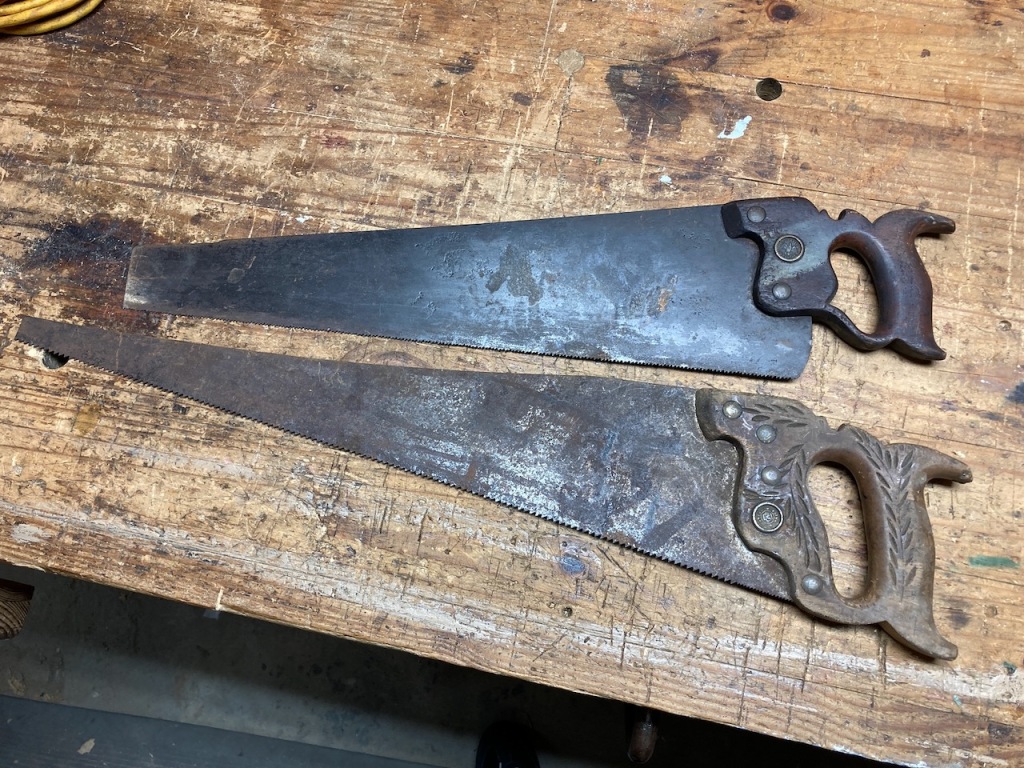
Take, for example, these saws I picked up recently at a local antique mall. I don’t recall what I paid for them–under $10 apiece, certainly.

The saw on the bottom has been resharpened so many times that the blade is about gone. I’ll take it apart and repurpose the nuts and probably the handle. I’ll eventually cut up the blade for card scrapers. That will be another story, though.

The smaller saw on the top, however, is getting restored. Underneath the dirt and rust is a usable tool with lots of life left in it.

I first removed saw nuts and the handle from this little saw. It was pretty easy to clean the rust off the blade. I just scraped the rust off with a razor blade, using a bit of WD40 as a lubricant. I finished up with a little bit of fine steel wool and wiped everything clean. (Do this over cardboard or something. It’s messy.) I scrubbed the handle with a green scrubby pad and some Murphy’s Oil Soap. Then once it was dry I applied a coat of Danish oil. Once the oil had cured, I put everything back together.

Now that the grime is gone, let’s take a closer look at this panel saw.

I can just make out the remnants of the etch, which is the Disston company’s keystone logo. There is a “00” in the center–whatever that means. The Disston company identified different model saws by number–No. 7, No. 8, etc., and on some saws the model number appears in the middle of the keystone. I’ve never seen a reference to a model “00,” though.

The medallion is just the Warranted Superior eagle, not the more desirable Disston-branded medallion. The Disston company sold its best saws under its own brand name, whereas secondary-quality saws were sold with the generic “Warranted Superior” branding, though there are often enough distinctive features to tell that the saw was made by the Disston company. This saw was probably sold under one hardware store brand or another, which explains the odd model number. It would be hard to date the saw precisely, but the saw’s features resemble saws made by the Disston company in the 1920s.

You can also see a little number 11 stamped just above the teeth below the handle. That indicates the number of tooth points per inch. The higher the number, the smaller the teeth and the finer and slower the cut. The lower the number, the faster and coarser the cut. 11 is definitely on the fine side, which means it will be good for making relatively fine cuts.

This saw is shorter than the average handsaw you find in the wild, although a 20″-long blade isn’t exactly rare. Disston made many of its most popular saws in lengths ranging from 16″ to 28″, with some models being offered with a blade as long as 36″! The average antique handsaw has a blade that’s about 26″ long. It seems like most people who were buying handsaws a century ago preferred longer ones to shorter ones. A long saw has the obvious advantage of being able to make a cut in a thicker piece of wood. Plus, you can cut a thin piece of wood with a long saw, but it’s harder to cut a really thick piece of wood with a shorter saw. But a short saw also has advantages. It can work more easily in tight spaces, and it will fit easily into a tool box.

This saw has certainly lain dormant for a while. There is some pitting on the blade, but fortunately none of it is down near the teeth, so the pitting is really just a cosmetic issue. The decorative nib near the toe of the blade has long been broken off or removed. The saw hasn’t been resharpened very often; there is still plenty of blade left.

But whoever sharpened it last did not do a very good job. The teeth were uneven in height, so it took me a while to re-file them back to an even height. But once I did, the saw cut really well. I am already enjoying having a smaller handsaw like this available for making fine cuts in small workpieces. This may well become one of my favorite saws in my growing arsenal.

Merry Christmas to me!

Posted in Tool Repair | Tagged , , , , , , , | 3 Comments

New Home, New Workshop, Same Woodworking

To make a very long story very short, this summer my family and I moved from southern Alabama to southeastern Ohio, where I have started a new job. We had lived in the same house in Alabama for 15 years, where I had found many ways to do my woodworking in a pretty small space. Over the years I had acquired many tools and a whole lot of wood, much of which I had cut and sawn myself. Then, in the space of a few months, I had to sort through it all and pack up everything I wanted to take with me. It was a lot of work, and I learned some important lessons along the way.

Let me tell the story through pictures.

First, the new house:

The new house is big and old and lovely. Like all old homes, it needs some work, but for its age it is in very good shape.

Our old Alabama house was about 1400 square feet and was built in about 1918. Our new Ohio house was built in the 1880s and is about 2900 square feet–not counting the huge attic and the basement. And it has a garage. So there’s plenty of space for all my woodworking tools–and then some!

The main problem, though, was getting it all there.

This was my main workspace in Alabama–one end of our large dining room. It took some time to clear off the old workbench and box up everything I had stored on, in, and around it. I had considered leaving my old bench and just building a new one when I got to Ohio, but I figured I would need a workbench immediately upon moving in. There are always little repair jobs that need attention, and it would be easier to do them with a full workbench available.

I had been hanging on to a lot of junk–bits and pieces of wood, wooden spoons that had cracked, prototypes I no longer needed, and templates I had long since replaced. I also had accumulated quite a lot of scrap for firewood. Some of it would have been worth keeping, had I remained in this house. But it was definitely not worth moving across the country. I burned some of it. I gave bits of usable wood away. And I ended up discarding a whole lot of scrap.

One thing I learned is that moving can be very expensive. Moving companies charge mainly by weight, and wood and tools are heavy. One of my relatives took pity on me and lent me a small box trailer with which to move my power tools, my workbench, and whatever lumber I decided needed to come. We ended up packing the trailer to the ceiling.

Once we got the trailer unloaded, the first order of business was to get the workbench put back together and get out my essential tools. Everything else could be brought out and set up a little at a time. I decided that the basement was the right place for my main workspace. The biggest room in the basement is about 12′ wide and runs the whole length of the house, which is plenty of space for a workbench, tool storage, and a sharpening station, as well as some lumber storage and the kids’ Lego collection.

The second thing I learned was that you should move all your tools yourself. The movers we hired were really good at their job, on the whole. But I made the mistake of letting them move my tool chest, which they up-ended at one point. I should have warned them not to do that.

I had had my chest packed pretty tightly, but not tightly enough. When I opened it, I found everything jumbled like this. My stomach sank as I gingerly picked up each tool and turned it over, looking for damage. Miraculously, the only damage I found was a little chip out of one chisel handle–nothing that couldn’t have happened during a routine day at the bench. I was so relieved!

As soon as we moved into our Ohio house, the utilitarian woodworking projects started. None of them were very exciting, but they all required a basic tool kit and a bit of skill. The first was new enclosures for my daughter’s pet box turtles, which will live outside during the warmer months. It was so nice to have a big, wide driveway to work in. It was also nice to be able to work in the July sun and not be soaked with sweat inside of five minutes.

Anyhow, we call these enclosures “turtleariums,” a word that I am pretty sure was made up by the 20th-century writer of children’s novels, Elizabeth Enright, who happens to be a favorite of my kids. The top of each turtlearium is hinged and can be opened to feed and care for the turtles. The slats are buried a little way under the soil to prevent the turtles from burrowing out, but they allow for plenty of air movement and a bit of extra sunlight, which the turtles love.

Another little job was to convert an unused doorway into a kitchen pantry. This is only the beginning of the many shelving units I have planned for this house. We own a lot of books, and we left quite a few built-in bookshelves in our Alabama house. So it looks like I will be building a big bank of bookcases to house our ever-growing library, probably this coming summer.

Now it has been a few months since we moved in, and I have finally gotten most of my tools unpacked and set up where I want them.

The old workbench is now at the center of a big workspace that includes a little sharpening station and my drill press, as well as several old cabinets that hold hardware and other supplies. (The Legos are now at the far end of the room.) I still need to build in some racks to hold lumber, and there are several other things to put into place yet.

But I am really enjoying having a lot of space to work with.

I have repurposed my small market table as a dedicated sawing station, and my new and bigger saw till fits right above it in this niche in the basement wall. (The floor does get pretty damp during the rainy seasons, so everything along the wall needs to be kept up on blocks.) The chopping block will eventually move elsewhere–not exactly sure where yet. And I will eventually hang a few more tools up on this board.

Did I mention that there is not only space for a workbench, but for two workbenches? Over the last three or four years, I have been laying up select pieces of wood in the hopes of building a new workbench. The old one is still serviceable, but I built it back when I didn’t know as much about woodworking–or about the kind of work I would be doing at it–as I do now. So, much of the lumber I brought with me from Alabama was the wood I had set aside for the new workbench. And because I have a lot more lumber to store and not a lot of shelving on which to store it, it seemed like the right time to start on the new bench. I am gluing the top up out of 4″ wide yellow pine boards. It’s going to be massive. The old bench will become more of an all-purpose utility/assembly bench, while the new one will be reserved for joinery.

A lot of things have changed now that we have moved to a new house in a different state. But some things are still the same.

I need a batch of small Christmas presents, and I brought a whole lot of spoon blanks with me, so I’ve been making spoons this week. They’re the first ones I’ve made in about six months.

It feels good to be back at it.

Posted in Home Improvement, House and Home | Tagged , , , , | 3 Comments

Going Commercial: 7 Ways Selling Your Work Will Change Your Craft

When I started selling my handmade wooden utensils at local craft markets about a decade ago, I had to figure out much of it myself. Having run a successful sideline for years, I have now drawn it to a close, and I’d like to share my experience.

Perhaps you are considering selling what you make at markets near you. You may be wondering, though—can I actually make money by selling my handmade goods at local markets, or is it a waste of time and energy?

Yes, you can run a successful side-business selling your craft work locally. I don’t think it’s possible to make a living at it—unless you are extraordinarily frugal and enjoy living in abject poverty. But if you do it right, you can make your hobby self-sustaining, and with time and persistence, you can even make it a boon to your household economy.

If you are considering selling your work regularly as a side-business, here’s what you need to know about how it will change what you do:

1. It will make you focus on what other people want more than on what you want.

People won’t buy things just because you feel like making them. You have to think about the many kinds of things you can make and figure out where those overlap with the kinds of things that other people want to buy. If you already have people asking to buy your handmade goods, that’s a great sign. But if not, that’s okay. There are ways to connect with the people who might want to purchase what you like to make. Yet selling your work consistently means you need to think about it in terms of product lines and inventory—making things in fairly standard shapes and sizes, and maintaining a balance between standardization and variety in your work. When every item on the craft table is utterly unique, then most of the items are not going to sell. You must figure out what your customers are most likely to want and focus on making that.

2. It will change how you think about your products.

You will have to think about what you make as a product, and you will need to consider your products in terms of time and money. You will have to decide how to put a price on your work (See my post on pricing), and you will have to do some rough calculations to determine how many products you can reasonably expect to make given your time, skill, and materials. If math scares you a little, don’t worry. This isn’t calculus or anything. It’s not even tax prep (although that may come into it eventually). It’s just a matter of thinking about how many markets you can commit to given how long it takes you to prepare, as well as how much you need to charge for your work in order to make it worth your time to make and sell it.

3. It will change how you spend your time.

You need to realize that a lot of the work you will do won’t actually be craft work. It’s not as bad as running a full-scale business, but be prepared to spend time on communication, sourcing materials, traveling to and from markets, and even a little accounting. None of these is very time-consuming in itself, but it does all add up. You will definitely spend more time crafting, but you will also spend more time doing other things that support your crafting.

4. It will change how you use your space.

You will need to stockpile raw materials. You will need a place to store your inventory between markets. And you will also need to store your market gear: a canopy, a big folding table, your signage, and any other props for the table. All that stuff takes up space. The first time you load your car to go to a market, you will be shocked to see that the product you sell is only a small fraction of all the stuff you will haul to and from markets.

5. It will change how you think about people.

Selling to family and friends is a good start, but it only goes so far. You have to get your products in front of your ideal customers—people who appreciate handmade work and have the expendable income to buy it. So you have to figure out who those people are. What kind of people actually want what you make? Where they are likely to shop? This was one of the biggest ah-ha! moments of my little crafting career. I had been at a couple markets early on and sold almost nothing, but I was sure that there was a market for my work. I just hadn’t found it yet. When I did finally manage to set up at the right markets, I started selling my work more successfully. So scope out different venues as you figure out who your target market is.

6. It will change how you work.

It will encourage you to refine your workflow and make it as efficient as possible. When your craft is a hobby, you can be as inefficient with your time and materials as you like. But when you need to get X-number of items ready to sell by X-date, then you have to economize wherever you can. You will learn to use designs that are simple to execute given your skills and your tooling, and you will begin to embrace templates. You will learn to work within tolerances and do batch work. While some parts of the process can remain spontaneous, you will get to discipline yourself to work with both precision and speed. The result will be that you will learn to stay focused and work faster than you did before, and you will become more skilled because of it.

7. It won’t be fun anymore.

I don’t mean that you’ll never enjoy your work again. You will still have the satisfaction of a job well done, but now it will be a job. I have not been making spoons for fun all these years. It’s not relaxing. It’s work. If you start selling your work regularly, then your craft is going to become a job that needs to be done. When you have a big market coming up, you have to make your products whether you feel like it or not. So you have to be okay with not doing it for fun anymore.

I want to emphasize that there is absolutely nothing wrong with any of this.

It is good that we get up every day and go to work whether we feel like it or not. It is good that we learn to see our work from other people’s points of view. It is good that we provide our neighbors with high-quality goods that they will value for years to come. Doing good work and selling it for a fair price is how the world keeps going economically.

You just have to decide whether you want your craft to become a part of that economic system. A lot of people get into crafting because it’s not part of the daily grind, but an escape from it. If that’s you, then why would you want to turn your craft into yet another job?

For me, though, woodworking has always been a matter of economics in the most basic sense of meeting household needs. I enjoy the craft, but it has always been work—good work, productive work, rewarding work—but work nevertheless. Early on, I decided that I would not allow my hobby to be a drain on the household economy. My woodworking needed to be at least self-sustaining, and for many years it has helped support the household economically.

In sum, here are the main benefits of going commercial with your craft:

A. Money. If you find the right market and price your work reasonably, you can supplement your income.

B. Community. At markets you will enjoy the company of like-minded people, and you will make friends.

C. Skill. Making products to sell will motivate you to develop your abilities and your speed.

D. Respect. You will find out what it was like to be a professional craftsman in the pre-industrial age. Our crafting ancestors honed their skills in professional shops, cranking out high-quality work with remarkable speed. They knew how to speed up and get the job done, and they knew when to slow down and get things just right. You will never be closer to your ancestors in the craft than you are when doing production work by hand for a whole day, and your respect for them will grow.

So if you decide to go ahead and start selling your work, here’s a rundown on how to get started:

Read my blog post about everything you need to get ready for your very first market.

Read my blog post on how to price your work fairly.

Read my blog post on best practices for selling your wares successfully.

Read my blog post on how to be such a great vendor that everybody invites you back.  

Posted in Wood and Woodwork | 1 Comment

Moving on from Markets

Over a decade ago, I set up a table to sell my spoons at my very first craft market. Now, after dozens of markets and hundreds of spoons, I have brought my spoon-making side-business to a close. While I am still willing to make spoons and spatulas upon request, I don’t plan to make them in batches to sell at markets anymore.

The reason is very exciting. After fifteen years teaching at a small, private college in south Alabama, I have accepted a new position at a larger, private university in Ohio. I will be moving my family there this summer.

I have decided that this move is the right time to quit the craft market scene—for two reasons. First, the repetitive work of shaping spoons has been taking a toll on my hands and wrists, and my body has been telling me for some time that it is time to slow down. Second, because my new job pays better than my old one, I hope I won’t need the extra income from spoon making quite so much as I have in the past. Plus, I have been wanting to explore other aspects of woodworking that I just haven’t had the time to get into yet.

Today I packed up all my heavy woodworking machines. For the first time in years, my workbench is clear. For the first time ever, my spoon-making tools and materials are packed away.

I want to thank everyone who has bought my spoons, who has invited me to markets, and who has told family and friends about my work. Crafting can be such a solitary activity, yet I have made so many friends at the many markets where I have been a vendor. I am so very grateful to have been a small part of a local arts & crafts community over the years. I am rich beyond measure in relationships.

In the coming months, I plan to blog a little bit about my move—about disassembling and packing up my current workspace and setting up a new (and bigger!) one. I am also hoping that this blog will get back to its original purpose of documenting a wide variety of woodworking projects, instead of focusing almost exclusively on spoon making.

Ohio, here I come!

Posted in Market, Woodenware | Tagged , , | 6 Comments

What’s the Difference between Art and Craft? Problem-Solving.

Just today, a spoon carver on a social media platform I follow asked other carvers, “Do you call yourself an artist or a craftsperson?” I was one of many who responded, and I said that I sell two kinds of things at my market table. I sell wooden utensils, which I make. And I sell small paintings done by my daughter on scraps of wood. When customers are browsing my table, they often ask me, “Do you paint, too?” I tell them, “No, my daughter is the artist. I stick to craft.”

Some customers protest mildly that my spoon-making work is also art. And I don’t fight them on it. In a very strict sense, I suppose they are right that all skilled making involves what we might call “artifice,” the imposition of preconceived form on raw material. But today people use the word “art” not so much in the sense of “artifice” but in the sense of “uniquely creative” and maybe even “self-expressive.” Art is, for most people, something unique created for an aesthetic purpose. And if I make my spoons to be nice to look at as well as pleasing to use, then yes, you could call them “art” as well as “craft.”

In the same way, my daughter’s act of painting requires the skillful use of tools (a paintbrush, a palate, paints, a Bob Ross video on YouTube, etc.) in order to create a picture. We call the result “art,” but most art that people really value is the result of what we would call “craft,” the skillful use of tools and techniques to achieve a desired result.

So What’s the Difference?

I say all this because I was also just reading an essay by Dorothy L. Sayers, who thought profoundly about the nature of artistic creation, as well as of craftsmanship. A professional novelist (she authored the Lord Peter Whimsy series of detective novels), Sayers makes an incisive remark in her essay “Problem Picture,” in the volume Letters to a Diminished Church:

…the artist does not see life as a problem to be solved, but as a medium for creation. (pg. 238)

This, I think, gets at the heart of the fundamental difference between craft and art. Even though in practice they are very seldom found in their pure form, one major difference between craft and art is that the practice of a craft is all about problem-solving, whereas art is about the creation of something new.

Craft is Basically Problem-Solving

When I set out to make a spoon, I approach the whole process as a set of problems to be solved. I want to get an optimal number of utensils out of this particular piece of wood, and I want to do so in an efficient manner. Each part of the spoon needs to be shaped by the use of particular tools. There is an optimal sequence of actions in which I shape first one part and then another part of the utensil.

All the while, I am working to produce something that will solve a other peoples’ problems. They have soup they want to stir or sourdough starter they want to mix. They need a tool that is durable and comfortable to handle, and just the right size for the job at hand.

You don’t make a good wooden spoon by accident, or by just fiddling around with a block of wood and some tools and seeing what comes out. If the spoon is too long or too short, too thin or too fat, it will only create additional problems for the user. In order to solve the problem of stirring or scooping food, the spoon maker has apply good design.

Making the spoon is a matter of sequential problem-solving, and the spoon itself exists to solve a problem.

Art is Basically Creation

If you want to scoop up your soup, you need something like a spoon. So you go out and buy a good spoon, and your problem is now solved. But imagine you also went out and bought a nice little painting, done by hand on a scrap of wood. You probably didn’t buy it to solve a problem. In fact, you probably didn’t even know you needed that little bit of paint-on-wood in your life until you saw the painting.

But even if you did set out to purchase a painting because, say, you had an empty spot on your fireplace mantel and you wanted a splash of color or a small conversation piece that would fit the empty space while complementing the decor, that is not why the artist painted the picture.

There was no pressing need in the world for a little landscape painting. Producing the painting solves no practical problem. The painter simply saw the potential for a new creation in that collection of raw materials. Granted that the process of artistic creation does involve a lot of practical problem-solving. How to mix the colors to get the right shades? Which brush to use to achieve this effect? But the artist is solving these practical problems in order to combine the materials before her into a new entity–a new creation.

To take another example, the Cathedral of Notre Dame in Paris is currently being rebuilt after a catastrophic fire. The reconstruction requires a LOT of problem solving. But in the end, Notre Dame does not exist as a solution to a problem. To ask, “What problem does Notre Dame solve?” is to ask the wrong question. As a place of worship, it is superfluous. People can worship God very well without it. It is certainly a cultural icon, a tourist destination, and a testament to the technical ingenuity of the Middle Ages, but those things are all by-products of the simple fact that the cathedral is an astounding work of art. Why should Notre Dame be rebuilt at such great cost of time and money? Because it is a work of art. It is better that it continue to exist than that it should cease to be.

The artist makes something that did not exist before, and behold, it is very good.

Let Craft Be Craft and Art Be Art

A few of my customers tell me that they don’t buy my spoons to actually use. They just hang them on the wall or put them in a jar to look at. Even though I crafted the spoons to solve problems, these people simply enjoy the fact that the spoons exist. I suppose I don’t mind if people see artistic value in craft work, though sometimes I think they would appreciate the spoons even more if they used them once in a while.

I think the best way to honor a work of craft is to use it to solve the problems it was made to solve. A hammer is made to drive nails, and a chair is made to sit in. The spoon is made to stir and scoop. The best will do their job exceptionally well–which you wouldn’t know unless you actually put them to use.

In the same way, one does not use a marble sculpture to prop up one end of a rickety table. A Mozart sonata does not exist as background music for a furniture ad. Although works of art can be used in this way, to do so devalues them as art.

In much the same way, a lot of people expect artists to be the world’s problem-solvers. Some movie star is asked what she thinks is the solution to the war in Ukraine or climate change–as if the person whose vocation is pure creation has any special ability to solve the world’s problems! If you want a practical solution, don’t ask artists. They’re busy creating things that didn’t exist before. Ask people who have some real knowledge of the problems you want solved.

To return, then, to the original question: what do I call myself in reference to the things I make? I call myself a crafter because I make things to solve problems. But my daughter’s painting is not problem-solving work. She creates new things–she is an artist.

Posted in Wood and Woodwork | 3 Comments

How Do You Set Prices for Handmade Goods?

So you want to sell your work at a craft market. One of the most common questions that new makers ask is how to set prices. We all know that everything has a price, but we seldom think about why something costs what it does–until we suddenly find ourselves having to write a figure on that price tag ourselves!

Sometimes artists and crafters are averse to thinking about their work in terms of dollars at all. It can seem so crass to put a dollar amount on a work of art, even if you do need to sell your work to pay the bills. How do YOU know what your unique work is really worth? Who knows how much another person would pay to own it?

There Are Two Ways to Set Prices

Way #1 is to use a simple calculation: Labor + Materials = Price. Pay yourself an hourly rate, add any materials costs, and calculate accordingly. Let’s say you are making wooden picture frames. How much should you earn per hour making picture frames? It could be minimum wage, but you are a skilled worker. So find out the standard wage for a skilled laborer in your region. If, say, an auto mechanic gets paid $25/hr., and you can make a picture frame in three hours, and if the materials cost you $10, then you need to price your work at $85.

Commercial shops use similar calculations, although they have to take many other costs into consideration–everything from utilities and administrative costs to insurance and wear-and-tear on tools. You may well be running a small business, but these are (probably) not costs you need to think about–at least not right now. When starting out, keep your calculations as simple as possible.

Way #2 is to just look at what comparable work is priced at locally or online, and stay in the ballpark. So if a handmade picture frame at a local arts-and-crafts market is priced at $90, and then you find a comparable one online for $75, then maybe $85 is a fair price.

The above figures are all arbitrary, but hopefully they’ll send you in the right direction.

You should also consider that prices will vary a lot by region. If you are in an affluent area where median income is fairly high, your work should command a higher price. But if you’re in an economically depressed region, you’ll need to price your work lower.

Beware Comparison

If you choose Way #2, you must beware of comparing your work to mass-produced products. Mass production has its place in the modern economy, but that is not the kind of work you are doing. There are good reasons that nice, tailored suits cost many times what mass-produced suits off the rack cost. Grigorio Armani is not competing with Kohl’s. Don’t ever try to compete price-wise with mass-produced goods of any kind!

Also be cautious when looking at prices online. Even when it comes to handmade goods, prices on the internet are often insanely low. Websites like Etsy have exerted a downward pressure on prices for handmade goods (often because the goods aren’t actually handmade in any meaningful sense), so where possible you should do your comparison-shopping in person in your local region, rather than online. Visit a couple craft markets and eyeball the prices for handmade goods of all kinds. You will soon get a good sense of what price range would be appropriate for your work.

Don’t Undersell Yourself

In the end, don’t worry too much about setting exactly the “right” price at first. You can always change your prices! If you price too low initially, you can just raise the price a little at the next market, until you find that sweet spot where your supply matches local demand. People expect inflation these days, so it’s okay to set your prices on the lower end and plan to raise prices as time goes on–and as your skills improve. Or if you set your initial prices too high, you can always reduce prices later, or even have an end-of-the-year sale to get rid of unsold pieces.

However, in my experience, artists and crafters often undervalue their work because of basic insecurity. You look at what you’ve made, and all you can see are the flaws. You need to know that those flaws are visible only to you, and that what your customers see is a unique, handcrafted work of art. Trust me: nobody will ever be as critical of your work as you are! Price accordingly.

Plus, many crafters and artists are used to living on a shoestring budget, so they really can’t imagine plopping down a large amount of money for the kinds of things they make for themselves. You have to accept the fact that your primary market is not other crafters and artists, but people who have more money and fewer skills than you do.

It’s crazy, I know. But there really are more people in this world who can afford to pay you well for your work than there are people who can do the quality of work that you do.

A Third Way

Which brings me to the final way you can set your prices. Just ask yourself what you honestly think your work is worth–what you would pay for it yourself on the open market.

Then double that figure.

Or triple it.

At that point, you’re probably getting close to the real market value of the things you make.

Posted in Market, Wood and Woodwork, Woodenware | Tagged , , , , , , , , , | 4 Comments

Do NOT Boil Your Wooden Spoons

You may have seen a TikTok video in which somebody tells you to clean your wooden spoons by boiling them in water. This person fills a pot with water, brings it to a boil, and then boils a handful of commercially-made wooden spoons for about twenty minutes. At the end, she points out how cloudy the boiled water is. She thinks she has gotten all the “dirt” out of her spoons.

I’m not going to link to the video because, frankly, it doesn’t deserve any more views.

What is actually happening in the video is that the wood itself has started to deteriorate in the boiling water. The spoons were clean to begin with. The boiling water isn’t removing food debris. What it is removing is the wood itself!

What is left floating in the boiling water isn’t food debris. It’s tiny pieces of wood!

The result is a utensil that looks very clean to the eye. But because the wood has been damaged, these spoons are probably more likely to catch and hold food debris than they were before.

Boiling your wooden utensils is a terrible way to clean them. It just wears them out prematurely. And for the record, the same thing happens when you wash them in the dishwasher.

So what is the best way to clean a wooden utensil? It’s simple. Rinse with clear, hot water and wipe them with a wet dishcloth. Set them in the dish drainer to air-dry. Use mild dish soap if you like, but you don’t really need to–unless you’ve had the utensil in raw meat.

If the original finish has disappeared, you can refresh it with one of the few vegetable oils that actually dry: walnut oil, hemp oil, or linseed/flaxseed oil. (Other vegetable oils will not dry and so will wash right off the spoon.) Flood the surface with the oil, wipe off the excess, and let it dry on a sunny windowsill for a couple days, turning occasionally.

There is never a good reason to boil your wooden utensils.

Posted in Wood and Woodwork, Woodenware | Tagged , , , , , | Leave a comment

For Narnia! A Stone Table Made from Wood

Whenever my kids start a new activity, I inevitably get sucked into it myself. This time it was a play at my local community theater. My youngest daughter landed the role of Lucy in a stage version of The Lion, the Witch, and the Wardrobe, and at first I did my best to step back and let her do her thing. But when the crew had trouble engineering a collapsing stone table for Aslan to be slain on, my wife asked me to help.

The table had been partially built, but if you know the story, then you know that the stone table has to break in half at a very important scene. They were having trouble getting it to collapse and go back together reliably.

Building sets is nothing like my usual approach to woodworking. I love to build things using special wood (often boards I have sawn from logs myself) put together with traditional joinery and crafted to last a lifetime. But for a stage play, everything is built from cheap construction-grade pine, lots of deck screws, and a couple layers of paint. Every object is meant to be used only X number of times and then disassembled or discarded.

So I grabbed my power drills and a circular saw and went to work on the thing. The only hand tool I used was a (very dull) handsaw, with which I cut a couple sharp corners off some plywood.

Opening night wasn’t far off, so speed was essential. (I took no process pictures.) The finished object has a plywood top with three supports. The supports on each end are hinged to a plywood base. That allows the whole thing to be carried on and off stage in a single piece. The central pillar is removable. When pulled out from the back, the two halves of the table drop down into a “broken” position.

For the record, I was responsible only for the engineering and the frame. The painting was done by others. I have no idea what the runic inscription is supposed to say–or whether those are even actual runes. But it looks cool, and that’s enough for the theater.

Here’s how it works: at the end of the scene in which Aslan is killed by the White Witch, the lights go out, and the actor playing Aslan gets up off the table and pulls out the central support. The audience hears a “bang!” as the two halves of the table fall and hit the base. The lights go back on as Lucy and Susan run onstage to find the stone table broken and Aslan’s body gone. It was a pretty effective prop, if I do say so myself.

Halfway through the show, however, the hinges at the bottom of each leg started coming off their plywood base. So I had to put in longer screws that ran all the way through the base. Then I cut off the points flush with an angle grinder.

My woodworking projects don’t usually involve this many sparks flying. But it this is theater, after all, and it makes for a fun picture!

Like I said–not my usual style of woodworking, but I enjoyed it.

Along the way, I managed to get roped into a few other odd jobs too. I had to repair the wardrobe itself once or twice. And I ended up making a shield for Peter to carry. It’s just a sheet of luan plywood screwed to some curved pine battens on the back. I used some scraps of leather for the handles.

My son got to model the shield for us before I handed it off to the crew to be painted. And although the stone table got disassembled after the show ended, I’m pretty sure this shield has made its way into the prop room and will probably show up in another show eventually. I should have signed it.

Best of all, the play was very well received by the audience. Nearly every night was sold out, and my daughter has gotten a real taste for the stage. It was her first acting gig, but it certainly won’t be her last. Which means that this won’t be my last foray into building props and sets, either.

Posted in Kids | Tagged , , , , , | 5 Comments

Breadboard Ends on a Stove Cover

I always enjoy it when somebody commissions a piece that gives me the opportunity to try something new. This time it was a friend who asked me to make her a wooden stove cover. (Full disclosure: I didn’t even know such things existed until she asked for one. Apparently a lot of other people don’t actually cook on their stove tops all that often?) Stove covers come in a few varieties. Some of them are designed to be used as cutting boards and even have juice grooves around the edges. Others have handles that allows the cook to remove the heavy cover more easily. A lot of the ones I saw online seemed pretty crudely constructed.

After talking with my friend about what she wanted (yes, handles; no juice groove), I dove into my stash of hardwood and came up with some rustic cherry boards. This is the result.

I’m pleased with the final result, and I hope the owner will be, too. It’s about 20″ wide, 30″ long, and 3/4″ thick.

I’m not going to detail the whole construction process here. Instead, I want to focus just on one element: the breadboard ends. I had never tried to make breadbord ends before, and this seemed like the perfect opportunity to try it out.

A stove cover may be a simple concept–just one wide board that goes on top of your stove–but the problem is that any wide board is bound to warp over time, especially when exposed to heat and/or moisture, both of which are normal in the kitchen. So any solid-wood stove cover needs to be built in such a way that the panel will stay reasonably flat over the long haul. That’s where the breadboard ends come in.

Other makers of stove covers solve the problem by nailing long battens across the panel on each end. The result is a pretty utilitarian look, and a surface that’s not actually flat all the way across. If that’s your thing, I have no objection. But breadboard ends result in a flatter, cleaner surface that looks like it was made by someone who knew what he was doing. (I hope to keep that illusion going here.)

Here’s how a breadboard end works: each end of a panel is captured inside another board whose grain runs perpendicular to that of the panel (as in the photo above). Each breadboard is attached to the panel with a tongue-and-groove joint combined with a number of mortise-and-tenon joints. The tenons provide strength, and the tongue-and-groove ensures that the panel won’t warp between the tenons. The resulting panel is very stable and very strong.

We begin our breadboard journey with the 20″-wide panel already glued up from five cherry boards that I had planed down from rough-sawn stock. The first step in making the breadboard ends is to cut what amounts to either a really wide tenon or a really long tongue on each end of the panel.

After laying out the shoulders with a straightedge and a knife, I used my stair saw to cut in the shoulders of the joint. (I love my stair saw for dadoes especially, but it works extremely well on any cross-grain cut whose depth needs to be precise.) This ensures that I have a straight shoulder that makes solid contact with the breadboard end all along the joint.

The next step is to remove the waste from the cheeks of the tenon/tongue. I went back and forth for a few minutes on the best way to do this, but I eventually settled on my rabbet plane, a Stanley 78. The tenon/tongue is only about 1″ long, so the rabbet plane should be able to take off the waste pretty well.

Except that it also made a mess in the process. Because of the plane’s construction, it caught a couple times on the corner where it entered the wood, mangling what should have been a nice, crisp edge. (It’s a good thing I started removing stock on the underside of the panel instead of on the top!) This rabbet plane works okay for cutting rabbets with the grain, but I’m not pleased with its performance across the grain. I quickly put it away and tried something else.

I pulled out my Veritas shoulder plane to see what it could do. Ordinarily, a shoulder plane is just for trimming–it’s not really optimized for heavy stock removal. But I decided to try it anyway.

I was very pleased to find that the plane worked well in this situation. I made the first few cuts just by tipping the corner of the plane into the saw kerf. After a number of passes, the plane was taking nearly a full-width shaving. It was slow going because the plane is designed to take a fairly light cut, and I had to stop a few times to clear the shavings from the throat. But it worked.

Soon the plane was cutting a very nice channel, and I was able to bring the cut right down to my layout line. The plane is only 3/4″ wide, so i left about 1/4″ of waste on the outside, which needed to be removed next. First I tried doing that with a small smoothing plane, but it was faster to just knock off the waste with a broad chisel and use the shoulder plane to remove any remaining high spots.

With the long rabbet/tenon now cut, the next step was to lay out the actual tenons and cut away the waste between them. Normally a breadboard end will have an odd number of mortise-and-tenon joints: one joint in the middle and the rest evenly spaced on each side. On this board, I decided to go with three tenons: one in the very center and two closer to each end. Each of the five boards in the panel has at least part of a tenon on each end. The panel will therefore stay together even if all the glue fails. (It won’t.)

The groove cut in the breadboard end itself is 1/4″ wide and 1/4″ deep, so each tenon needs to be 1/4″ thick, with a 1/4″ tall tongue running on each side of it. Instead of using a ruler or something like that to lay out the height of the tongue, I just used the width of my 1/4″ paring chisel to guage the height of each tongue.

I used a coping saw to remove the waste between the tenons. Fortunately, the tongue will be completely concealed inside the groove–except on each end–so the tongue is intentionally cut just a little bit short to ensure that it bottoms out in the groove only on each end. This whole process is pretty involved and takes a lot of time, so it’s good to economize by working quickly to approximate measurements whenever possible.

In a similar way, the mortises in each breadboard end are intentionally cut a little longer than necessary, which will accommodate some wood movement across the width of the panel. I used my plow plane to cut matching grooves into the breadboard ends, and the grove provided a very handy guide for placing each mortise. (Sorry, no picture; I was in a hurry to finish at this point.) I chopped each mortise with a mortise chisel. I also made each breadboard end a fraction of an inch long so that I could saw it off flush with the panel’s edge on each side.

Because the breadboard end runs across the grain, it needs to allow the panel to swell and shrink across its width as the humidity level changes. I intentionally used quarter-sawn boards for the panel, which will move less than flat-sawn ones, but there will still be some seasonal movement. The normal procedure, then, is to glue only the tenon in the center, and to use some more flexible way of securing the tenons on the outside. I opted to just peg them with poplar dowels.

I considered doing a true drawbored joint but decided that was more complicated than necessary. I merely clamped the whole assembly from each end and bored a hole through each joint. With the panel still clamped up, I tapped in a poplar dowel. With the clamps removed (once the glue in the center joint set), I trimmed the dowels flush on both sides. The poplar is soft enough that it should compress just a bit as the panel swells and shrinks throughout the seasons.

I rounded over all the edges with a hand plane and sanded the whole thing smooth to get it ready to finish. There were some old bug holes that I plugged with walnut sawdust flooded with CA glue and scraped flush with the surface. The result is a dark colored patch that adds just a little bit of visual interest and looks a whole lot better than an open hole in the surface of the wood.

I did also need to address the mess that my rabbet plane left on the shoulder of that one joint.

To explain how I fixed this, I need to back up in the assembly process a couple steps. Before putting on the breadboard ends, I created a wall around the gap with painter’s tape and filled the hole with cherry sawdust. Then I saturated the sawdust with CA glue (superglue) and let it set–the same process I use to fill the bug holes above. Once the glue set, I was able to sand the patch flush with the surface. The resulting patch is sturdy and will blend in well enough with the surrounding wood.

I finished the stove cover with several coats of Danish oil, which really brought out some lovely figure in the cherry wood. Last, I installed two black door handles on each end.

In retrospect, it was a lot of work to end up with what amounts to a single, flat board. But this board is going to stay flat, and I learned a lot in the process. I’m glad I did it.

Posted in Build-Alongs, Wood and Woodwork | Tagged , , , , , , , , | 7 Comments