Every woodworker should have a few marking gauges. Sure, you can buy a nice one, but why buy what you can easily make for yourself? Making your own marking gauge is a healthy exercise in detail work, and you can customize every aspect of it to fit your own hands.

I have built a dozen or more gauges and have settled on a design that I especially like. The marking gauge I am building in this post will look something like the ones above: black cherry and pecan with a laminated fence and a captured wedge for a locking mechanism.
Stock Selection
If you have any hardwood scraps lying around, you likely have all the wood you need to make a marking gauge. Any hardwood will work for a fence, and even pine will do for the arm. But since you are going to be handling this tool a lot, it should feel good and look good. Figured hardwoods or fancy exotics are exciting choices. At the moment, I have some scraps of cherry and spalted pecan lying around from a recent project, so I’ll use those.
Because the fence will undergo considerable wear over the life of the tool, it’s best to make it out of a very hard wood. If you don’t have a piece as thick as you’d like, consider laminating two or more pieces together.

I had enough scraps to make a whole batch of gauges. I will cut two fences out of the lamination in the foreground and two more out of the lamination in the clamps in the background. (A finished marking gauge is visible at right. It is made from maple with an ebony face. It works fine, but it was an early attempt at this design, and I’m not pleased with it aesthetically.) Because I like contrasting woods, I decided to laminate the pecan–a very tough wood–to some cherry–a softer wood–in order to get the thickness I like for the fence.
Exact dimensions are not critical. You should scale the gauge to your personal preferences. I like an arm that is about 5/8″ square and at least 10″ long, which is longer than most commercially made gauges. My fences start with about a blank that is about 1 1/4″ thick and 3″ square.
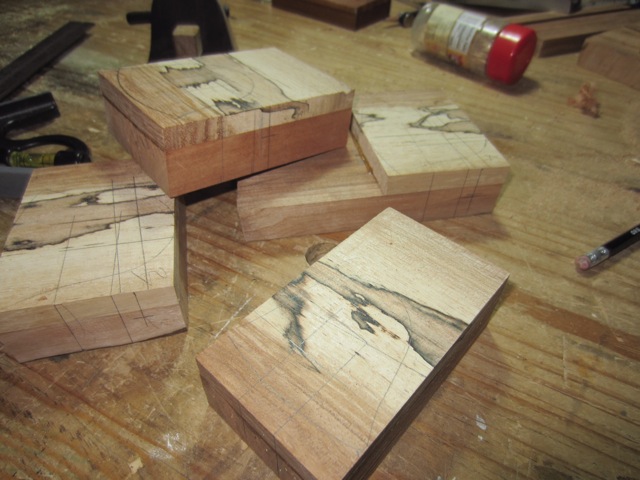
The gauge I am building has one idiosyncrasy. I have laminated the two pieces so that their grains run perpendicular to each other. It’s an aesthetic choice, mostly. Typical gauge fences have the grain running vertically because the locking mechanism is on the top. If the grain were run horizontally, the fence would split if the gauge were over-tightened. However, the cross-grain wear soon becomes apparent on the front of the fence. So why not have it both ways? The thin, hard piece on the front of my fence will hide the wear marks, and the thicker piece will hold the locking mechanism. Plus, with this piece of pecan, I can place a strip of the harder heart wood below the arm where the fence will see the most wear.

Once the lamination is glued up and planed down, it is important to square up two adjacent edges. These serve as reference edges throughout the build, and they are especially important for transferring layout lines from one face to the other.
The Fence Profile
Once you have your arm squared up, set it upright in the middle of your fence stock.

Take your time getting it in exactly the right place, as everything references from here. Use a square to get it set square to the reference edges. Then trace around the end with a pencil. Carry the lines around to the back of the fence.

On this particular piece, I’m laying out two fences on the same piece, which I will now cut apart.
Now it’s time to decide on a fence profile. There are many different profiles to choose from, but yours should fit your hand and be scaled to the kind of work you like to do. Many commercially made gauges use straight sides with a rounded top and bottom. A traditional shop-made shape is rounded at the top and flat at the bottom. I’ve seen circular fences, too. You can make yours banana shaped if you really want to.
I have developed my own profile, which is shaped like a bell in order to provide a larger reference surface below the arm without making the fence cumbersome to hold. I lay it out with a compass.

This blank is just wide enough that I can get two fences out of it, a large one for me and a small one for one of my daughters.
It’s not necessary to make gauges in batches, but I happened to have a cherry offcut wide enough to do so. However, you can never have too many gauges, so if you have enough stock, make two at a time. And you never know when you’re going to mangle one of the workpieces.
Locking Mechanism: The Captured Wedge
Before you cut out your fence, you need to bore the hole for the captured, wedged dowel.
There are several popular locking mechanisms for marking gauges, but nearly all commercially made gauges require two hands to operate–one to hold the gauge and the other to lock it. That’s awkward when you’re trying to hold a workpiece or ruler up to the gauge with one hand, too. This captured wedge, sometimes called a French wedge, allows you to lock the fence with your thumb alone, freeing your off-hand for other purposes.

Here is another gauge made from sweet gum. The captured wedge is a dowel with a notch cut into it and inserted into a hole bored through the fence. Press the dowel with your thumb and the notch presses the arm into the corner of the mortise, locking it in place. To release, push the dowel the other direction.

The only difficult part of making this mechanism is boring the hole accurately at an angle. First decide which direction it will be angled. If you are right-handed, you want to be able to lock the gauge with your right thumb. That means that, looking at the front of your fence stock, the hole should be higher on the right side and slant down slightly to the left. If you are left-handed, merely reverse the process.
It is crucial that the hole partly intersects with the mortise. Use a sliding T-bevel to mark out a nice, gradual slope across the fence stock. What angle do I use? I have no idea. All that matters is that no more than half of the diameter of the hole intersects with the top of the mortise. I use a 3/8″ dowel.
To bore the hole at the angle, I guess you could fiddle around with your drill press table until you got the angle you wanted. You can also eyeball the angle and bore the hole freehand.

I was feeling lucky.
Cutting the Mortise
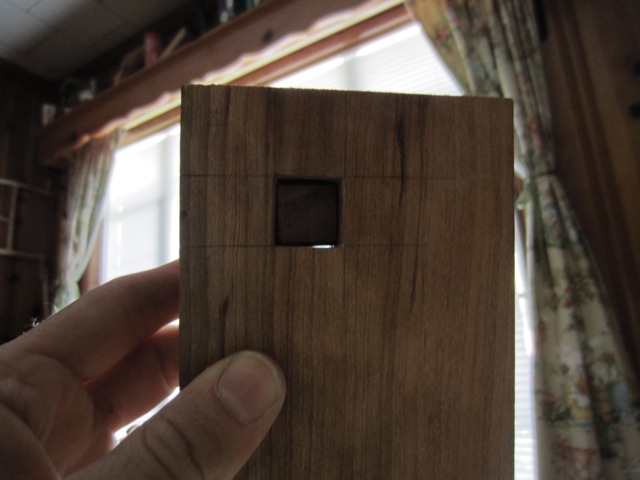
Even if your hole boring is a little off, you can always erase your layout lines and move your mortise accordingly. But you won’t be. Accuracy is not as difficult as it looks. To cut out the mortise in the fence, use the mortising technique of your choice. Just remember that this is a through-mortise, and both sides will be visible, so cut with care.
I usually bore small holes in all four corners and then cut nearly to my layout lines with a coping saw. Then I use a chisel to pare back just to my lines.

[Edit to add: a faster way is to bore a single, large hole in the center of the mortise and pare back to the layout lines with a chisel. Bore and pare from each side.]
I find that it is easier to fit the arm if you under-cut the mortise on all sides with the chisel. Work from both sides so as not to split out the work.
This is the time to begin test-fitting the arm. It is best to cut a small chamfer on the end of the arm. Be sure to relieve the edges of the arm, too. Sharp corners will tend to get stuck. Don’t forget to mark the arm so that you are always inserting it the same way.

Do your test fits like this: testing for fit in one direction with a corner of the arm, then in the other direction. Because the captured wedge will engage the arm from above, the mortise needs to be tight only on the sides. A loose fit side-to-side will render the gauge inaccurate. The top and bottom fit, on the other hand, should be downright sloppy.
At this point, I move to a small, flat file to gradually widen the mortise to fit the arm. Find a pillar file if you can–it has one or two safe (uncut) edges, which makes it easier to work into the corners. Be careful to keep the mortise walls square to the face of the fence.

You can use a small square to check for square, but it’s just as easy to eyeball it by setting the file in the mortise and looking at it from the side. Here I obviously need to take a little more off the bottom on the right side. (Yes, a wine cork makes an excellent file handle.)
Once the arm just starts squeezing into the mortise, hold it up to the light. That will tell you where you still need to take material off.
This one is looking pretty good. There should be a nice gap at the top but none on the sides.
Keep filing the mortise if you want to, but once I have the mortise nice and square, I prefer to modify the arm to fit the mortise. Plane it down with a block plane until it slides through the mortise snugly with hand pressure. I sometimes rub the sides of the arm on a piece of coarse sandpaper stuck to a patten to gradually reduce the thickness of the arm for a perfect fit.
The Captured Wedge
There are several ways to obtain a dowel. A store-bought dowel works fine, but if you want a dowel that matches the rest of the gauge and you don’t have a lathe or a dowel plate, you can make your own dowel pretty simply. Saw a piece of matching (or contrasting) scrap to 3/8″ square and at least 4″ long. Then clamp a 1/8″ thick piece of scrap vertically in your vise to use as a stop.

Lay the workpiece into the gap in the vise and, using the scrap piece as a planing stop, remove each corner with a block plane to make an octagon. Plane down each face in turn until the piece just passes through the hole. I find that a “dowel” with an octagonal cross-section holds a little better than a round dowel anyway.
Insert the “dowel” into the hole in the fence stock. Use a pencil to reach into the mortise and color all of the dowel that shows protrudes into the mortise. You will cut away that portion to make the notch.

Now saw the stopping cut with a small saw and pare away most of the pencil-colored wood with a chisel.

Don’t cut away the whole section all at once. Pare away about half of it, reinsert the dowel, and check for fit with the arm. The arm should slide easily into the mortise with the dowel inserted, and the mechanism should lock securely with a minimum of travel in the dowel. Once you are sure of the fit, proceed to shaping the fence profile.
Shaping the Fence and Installing the Cutter
I won’t give you definite instructions on shaping the fence. You are shaping it to fit YOUR hand, remember?

I like to use a turning saw to cut out the basic shape and then refine it with rasps and files, and occasionally a spokeshave and a card scraper. You can use a band saw, a spindle sander, a belt sander, or another carcinogen-spewing machine of your choice to shape the profile. Another possibility is to use a backsaw to make a series of cuts close to your lines and then use a rasp to shape the curves. Follow up with a file and sandpaper.

Whatever your method, the end result should please both your eyes and your hands. The last step is to cut the dowel to a comfortable length on each side and ease the corners on each end.
Now that you’ve spent all this time on the wood, don’t forget that a gauge needs a cutter to work properly. Here, again, you have a lot of options. I like to use a modified upholstery needle for a cutter. Tap the needle into the bottom of the arm like a nail, about 1/2″ from one end of the arm, and then cut the needle off about 1/4″ from the surface. Use a small file to shape the end of the needle to a knife edge.
The Finish
If you used a fancy piece of wood, naturally you want a finish that will bring out any color and/or figure. Do not use a film finish. It will wear off the fence in no time. An oil finish is more appropriate because it does not show wear as quickly and can be renewed if necessary. I prefer a couple coats of a homemade Danish oil finish: equal parts safflower oil, mineral spirits, and polyurethane. Flood the surface, wait 15 minutes, and reapply. Repeat as often as you like, and then buff dry with a clean cloth.

The gauge you have been following is at the far left. The middle two I made for others, and the small one at right is for my daughter. I hope she likes it.

Great explanations, thanks! What is your take on adding a rabbet to the fence to help it register?
For a panel gauge, I consider a rabbet on the fence to be essential. I’ve used one with a rabbet and one without, and the one with the rabbet is easier by far to register.
For a regular marking gauge, however, I wouldn’t bother. To use a gauge like mine, you drag the cutter across the workpiece. Plus, I like to be able to both push and pull the gauge, depending on the situation. That means the gauge needs to be able to tilt in either direction. A pin-style gauge is also good for pricking holes, so it needs to be usable straight up-and-down, too. A rabbet in the fence would make the gauge less versatile.
More info on using this gauge here: https://literaryworkshop.wordpress.com/2011/04/02/how-to-use-a-marking-gauge/
Excellent tutorial. And that spalted pecan is some good eye candy.
Do you have any suggestions/specifications for making a panel gauge?
Sure. Just make everything bigger. 😉
It really is about that simple. A panel gauge arm can be anywhere between 18″ and 36″ long, and the head needs to be wider so as to register securely on the workpiece. A rabbet on the underside of the fence also helps a lot.
The locking mechanism can be any number of variations on the captured wedge. You can see a picture of the captured wedge on my own (partially completed) panel gauge here: http://i163.photobucket.com/albums/t315/bibliofile13/Tools%20Only/PanelGauge5-09002.jpg
I find that a panel gauge works better with a pencil or a knife than it does with a pin. The arm is long enough that you can mount a pencil on one end and a pin on the other and just flip the arm around depending on which you need.
Steve thanks for another great tutorial, I have enjoyed the gauges you sent me and want to make a couple myself. I especially want to make a panel gauge.
Thanks for sharing !
Steve
These MG’s are so pretty, I think I’d just put them on my shop shelf and look at them each day… I’d also slap the hands of anyone who tried to use them. These are real artwork.
Pingback: Shop made marking and mortise gauges | Tools of our Fathers
I just made two of these thanks to your directions. (The 98% of the time I didn’t follow them wound up in mistakes, troubleshooting, and cussing.) I’ll post a pic when I figure out how to, but in the meantime let’s enjoy not seeing my watered-down derivatives. Cheers!
Glad I could be of help!
Pingback: General Tools Marking Gauge: A Review | The Literary Workshop Blog