For the past five years or so, I’ve been making do with a Crown marking/mortise gauge, which works well enough, but requires two hands to adjust and lock. Ever since I started building my own marking and cutting gauges, I’ve been keeping my eye out for a design for shop-made mortise gauge, although I had never found one I liked until I ran across this one on Peter Follansbee’s blog:

See the series of knife marks on the side of the arms? Line them up and you get precise, repeatable settings without having to measure your mortise chisel each time.
I love the fact that it doesn’t leave offset gauge lines, and that it can be locked with a thumb. So with a little encouragement from Mr. Follansbee, I decided to give the project a try, though I made my own modifications to the design.
Here’s mine:

It’s made from cherry and pecan. I laminated the fence for durability, and if you look closely, you’ll see that the grain of the two woods is oriented at 90* to each other. The pecan grain is going side-to-side, so that the grain runs in the direction of the wear. The cherry grain is going up and down, so the wedged dowel doesn’t split the fence when tightened.
For those not familiar with the locking mechanism (perhaps a French design?), there’s a notch in the dowel, which crosses the arm at a slight angle.

Push one direction, and the wedge tightens; push the other direction, and it loosens. I have it oriented so as to tighten when my right thumb pushes it.
Here it is disassembled:

The arms slide together, and the mortise capacity is over 1.75″, which is more capacity than I’ll probably ever use. I decided to use pecan for the lower arm for the sake of durability, and cherry for the upper arm because, well, I like the repeating contrast in the fence and arm. The little block in the upper arm is pecan because it is less likely to split when I drive in the pin.
The Build-Along
I built this tool entirely with hand tools, and the wood came from some scraps I had lying around the shop. Here’s what I started with:

A laminated fence blank and two identical arms. The fence face started at about 3/8″ thick, and the cherry stock behind it started at 7/8″ rough, but I have no idea what the final thickness was. Anything an inch or more thick works just fine. It’s about 3″ square.
I planed one arm down to something that looked nice, about 1/2″X3/8″ thick. I have no idea how long they are. Maybe 9″ or so? I didn’t measure, just cut them where they looked right. The precise dimensions don’t matter; what matters is that everything is dimensioned precisely. Two edges of the fence need to be square to each other, but the other two are left rough.

The mortise is placed in the middle by eye. Just get it approximately in the center. You’ll shape all the sides eventually. To draw the mortise, I balanced the arm in the middle of the fence blank, marked height and width with a pencil, and then drew in the lines with a square and carried the lines around to the back. I also used a sliding bevel to lay out the hole for the wedged dowel.
As you can see, the lower line should intersect with one of the top corners of the mortise and angle down across the mortise so that half the dowel will pass through the mortise on the other side. You can fudge it a little one way or the other.
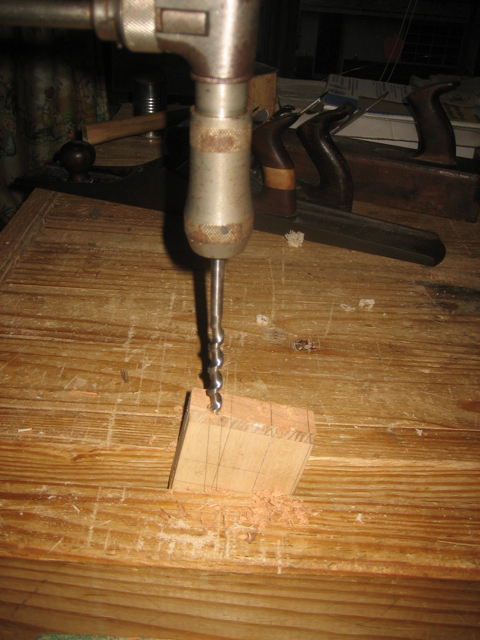
Especially when you’re boring freehand. I just watch my gauge lines closely.

Close enough for me!
I’ll spare you every step of the tedious mortising sequence. It’s simple, but not a process to be rushed.
The arms are already dimensioned. I first drill holes in the four corners and take out the majority of the waste with a coping saw. (Another, faster option is to just bore one big hole in the center using a bit that is just a little smaller in diameter than the mortise is wide. Then skip the coping saw work.)

I use a chisel to chop back almost to my layout lines. At this point, I begin testing the arm in the mortise from both sides. I file down to the layout lines with a pillar file, which has a safe edge. You can use a regular mill file if you are careful. Test the fit frequently.
The top-to-bottom fit should be fairly loose, since the wedged dowel will press the arm down in that direction anyway. But the side-to-side fit should be piston-tight. Ideally, the arm should move through the mortise with firm finger pressure, and should not wobble side-to-side at all when the arm is locked. Check frequently to be sure your mortise runs is dead-straight, exactly parallel to the face of the fence!
You can keep filing away at the mortise, or you can plane/sand down the arm, whichever seems best. I find that it’s best to get the mortise close and then sneak up on the final fit by planing down the arm.
In the meantime, the arm needs to be slotted and fitted.

I laid out the slot with my old mortise gauge (Kind of like training your own replacement, isn’t it?), bored holes at each end, and took out the waste with a coping saw. Then I chiseled down to the lines. Shaping the small block into it was not very easy, but I got it fit eventually. I super-glued the block onto the upper arm. When I insert the pin, it will also secure the block to the arm.
To make the locking dowel, merely put the dowel through the hole, reach inside the mortise with a pencil, and color the exposed dowel. Pull it out and cut out the colored part.
So here it is, all fit together:

If you chamfer the ends of the arm, it’s easier to fit into the mortise. Plus, it just looks tidy.
Shaping the fence is the fun part. Some time ago, I hit upon the bell-shaped fence, which is very comfortable to hold and provides a larger registration surface than most conventional fence shapes. I lay it out with a compass. The bottom profile is laid out by placing the fixed foot of the compass at the very top of the fence stock. The top profile is laid out by placing the fixed foot at the top of the mortise, which is about a 1″ radius.

The bow saw got a good workout here.
After some rasp-and-file work, I cut both ends of the dowel to final length, sanded the fence, and put in my pins, which are only a couple finish nails with their heads clipped off and the remaining stump sharpened with an auger bit file. Not fancy, but it works okay. I did drill pilot holes since I was nailing so close to the ends.

The arms don’t always stay perfectly parallel when the fence is locked in place, so I added a pin at the far end of the arm that slides in a saw kerf:

The pin is just a finish nail with the head clipped off, and filed down to fit snugly in the slot. I waxed the pin so it wouldn’t stick.
For a finish, I wiped on a very thin coat of safflower oil, just enough to warm it up a little and bring out the color contrast.


The whole process took me an afternoon. Overall, I’m very pleased with both the design and the results. And that old Crown gauge will eventually find its way to the very bottom of the toolbox.
[Edit to add: Some time later, when I bought some decent mortise chisels, I set my gauge to each mortise chisel and then marked a knife line across one side of the arm. That way, I can re-set the gauge to each mortise chisel just by realigning the lines. It saves a lot of fuss when mortising.]

Steve a very nice Gauge and one I plan to make to go along with the other Gauge’s I received from you. I like this design very much and your wood combination I especially like. Great Job and thank you for taking the time to share and post this tutorial.
Thanks again !
Steve
Nice! I’ll have to build one of these!
Excellent project build, thanks for
taking time to share with us.
Pingback: Shop made marking and mortise gauges | Tools of our Fathers