As a professional teacher, I own a lot of dress slacks. Until recently, I had them hanging on a variety of different hangers, most of which sagged and left unsightly wrinkles on each leg. There are a lot of effective ways to hang up a pair of slacks without wrinkling them, but most good hangers are expensive and hog valuable space on the rack. My new pants hangers each cost approximately 75 cents took under five minutes to make.
Making them requires only a few simple woodworking tools and almost no skill. Here’s how I did it.
I began with some old wire hangers that came from the dry cleaner. Such hangers are easy to find. These are have a cardboard tube that each end of the wire sticks into.

I had most of my slacks hanging on hangers like these. They worked for a while, until the cardboard began to sag and finally break in the middle.

I had a lot of them.
You could use regular wire coat hangers for this project just as easily, but I had these ready to hand.

The first step is to use wire cutters to snip off the lower wire close to each end. I cut the wire about 3/4″ from each end, but the exact length isn’t critical.
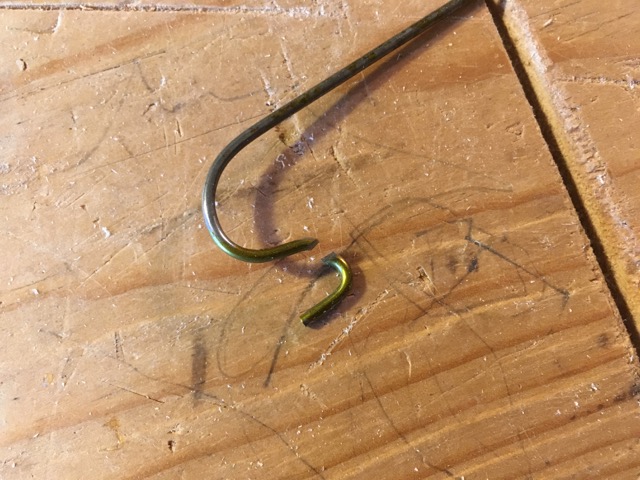
I also clipped the wire at an angle so as to leave a sharp point. That will be very helpful later when it comes time to assemble these. Be careful, though, as cut wire IS very sharp.

The next step is to cut the new wooden rod to length. I used 1/2″ diameter poplar dowels from the home center. They’re often labeled “hardwood dowels,” and the wood often has a slightly green color. They should run you less than $2 apiece. I got mine for $1.69 each.
At the store, take some time selecting the straightest dowels you can find. To test straightness, just sight down the length of each dowel rod. If they look straight, they are straight enough. But if you don’t trust your eye, roll them on the floor. A bent dowel will wobble a lot. A straight one will roll pretty evenly.
Cut your dowels to 16 inches long. If you bought 48-inch dowels, you can get exactly three hangers out of each dowel with no waste! I cut them with a small hand saw and a bench hook–that’s the handy holding device pictured above. (See the end of this post for more details on making a bench hook.)
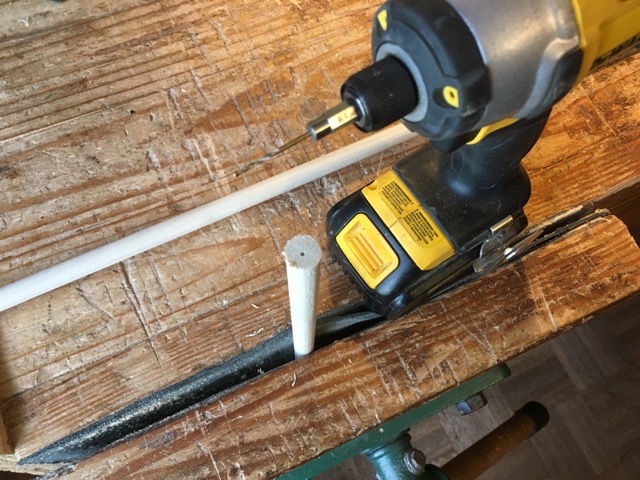
Next, drill a small hole into each end of the dowel. You can eyeball the approximate center. Go as straight as you can, but don’t sweat a crooked or off-center hole. The hanger will work fine even if your drilling is off a little bit.
I like to stand my stock up in a bench vise, but if you don’t have a vise, you can brace one end of the dowel on something solid, hold the dowel in your hand, and carefully drill the end. I braced mine onto my bench hook, and it worked great. Just don’t slip!
Poplar is a fairly soft wood, so use a smaller diameter drill bit than your hanger wire. I used a 1/16″ bit, but you could go one size bigger without trouble. The exact depth of the hole is not crucial. I just drilled to the depth of the drill bit’s flutes.

The dowels come from the store sanded smooth–which is great if you want them like that. However, I don’t like my slacks slipping off the hanger and onto the floor at the slightest touch–as they will if the rod is too slick. So I used a piece of 80-grit sandpaper to roughen the rods a little. I just swiped the sandpaper down the length of the rod once, turned it slightly, and did it again, until the whole rod was just a little coarse. Just remember to clean off any sawdust before you hang your slacks on these things.
While you’ve got the sandpaper in your hand, also sand off any ragged fibers that the saw left at each end.

Now it’s time to assemble your new hanger. With your fingers, press each cut end of the wire into the holes in each end of the dowel rod as far as you can.

If you feel they haven’t gone in far enough, a few taps on each end with a hammer will seat the wire firmly. If the wire doesn’t seem secure, you can always add a dab of strong glue, such as E6000 glue or even hot glue, to each hole. But that probably won’t be necessary.

And that’s all there is to it! Hang up your slacks on your new hanger.
I didn’t use any kind of stain or finish on the wood because (a) I didn’t want to wait for a finish to cure, and (b) I don’t want any smelly or sticky stuff on my clothes. These are going in my closet anyway, and I really don’t care what color they are.

I made up a dozen of these in under an hour. It’s probably the easiest woodworking project I’ve done in years–and I’ll use the hangers I made for years to come.
Bonus: The Bench Hook
I use my bench hook all the time. I actually have two of them, and for cutting up long stock it’s nice to have a pair. But for small stock, one works just fine all by itself.
A bench hook is simple to make, and almost as simple to use. Each one consists of three pieces of wood. The base is a wide-ish board 3/4″ thick. Mine is about 8″ wide and 12″ long, but exact dimensions aren’t critical. You could easily build this with smaller pieces–whatever you have on hand.

The other two pieces are they cleats. They are narrower bits of wood, almost as long as the base. They can be screwed, nailed, or glued to the base, as you see above. Mine are glued on. If you’re right-handed, the smaller piece should go almost to the right-hand end of the base but not quite. Leave between 1″ and 1/2″ of the base protruding past the cleats.
To use the bench hook, the lower cleat hooks over the top of a workbench or table. You hold your stock against the upper cleat with your off-hand, and you saw with your dominant hand. I have two sawing spots in this bench hook–one on the end and the other in the middle. The one in the middle is best for very small pieces that need to be supported on both sides of the saw. I use the spot on the end for everything else.

When one side of the bench hook gets too chewed up to use–which will take quite a long time–you can flip the whole bench hook over and use the other side. This essentially doubles the working life if the jig.
The saw I’m using is a cheap dovetail saw made by crown, which I think retails for about $25. But any normal, sharp saw with relatively small teeth can be used effectively on a bench hook. With practice, you can hold a workpiece firmly and saw a clean, straight line with ease–no clamping required.
If you do much craft work at all, I highly recommend investing the fifteen minutes it will take you to make one or two bench hooks.

Thank you! I’ve been looking unsuccessfully for metal hooks to use with a wooden hanger, but never thought of doing it this way. Nor would it have occurred to me to roughen the dowels rather than smoothing them. Time to go pick up a few dowels.
When I first read your title I thought what a good idea to make a hanger for your wooden pants, then I thought couldn’t you just lean your wooden pants up against the wall? But then I really wondered where do you buy wooden pants or are they a shop creation? I’m sorry I couldn’t resist.
This is a really good idea that I would steal if I didn’t keep cutting up my hangers to use the wire for something else.
When you are young you wear pants.
Then you wear slacks.
Then you wear trousers.
Personally, I refuse to trade in my pants for slacks but that’s another story.
Your solution is not only a great way to solve an annoying problem, but also allows me to easily customize hangers for an odd sized closet in my house where normal hangers are too wide. Mind you, I have grudgingly mulled this problem for 25 years and not mustered the resolve to tackle it. Now I have the solution.
Thanks so much. 33 years as an engineer and I totally missed this one.
Steve